

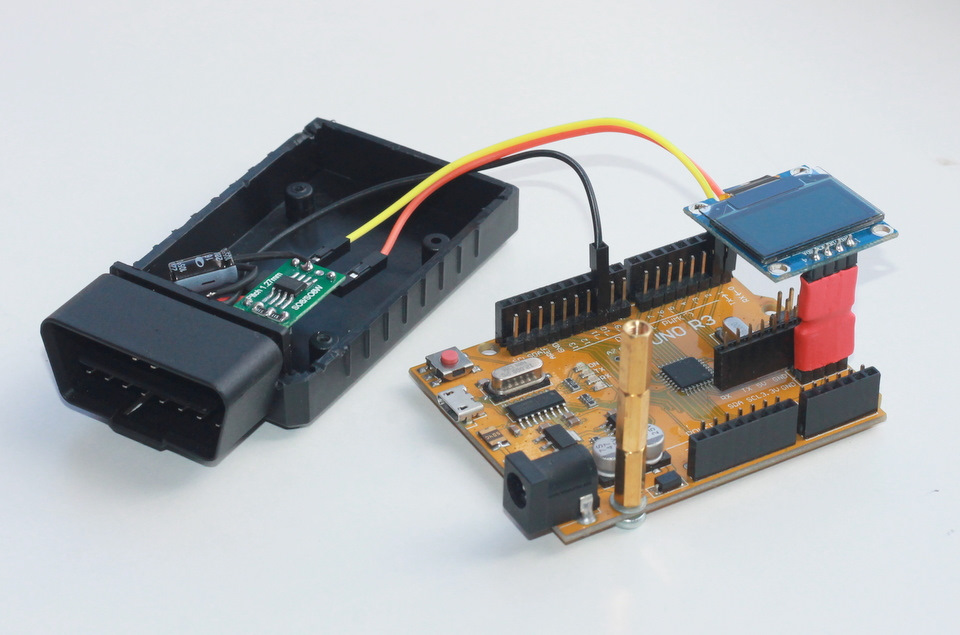
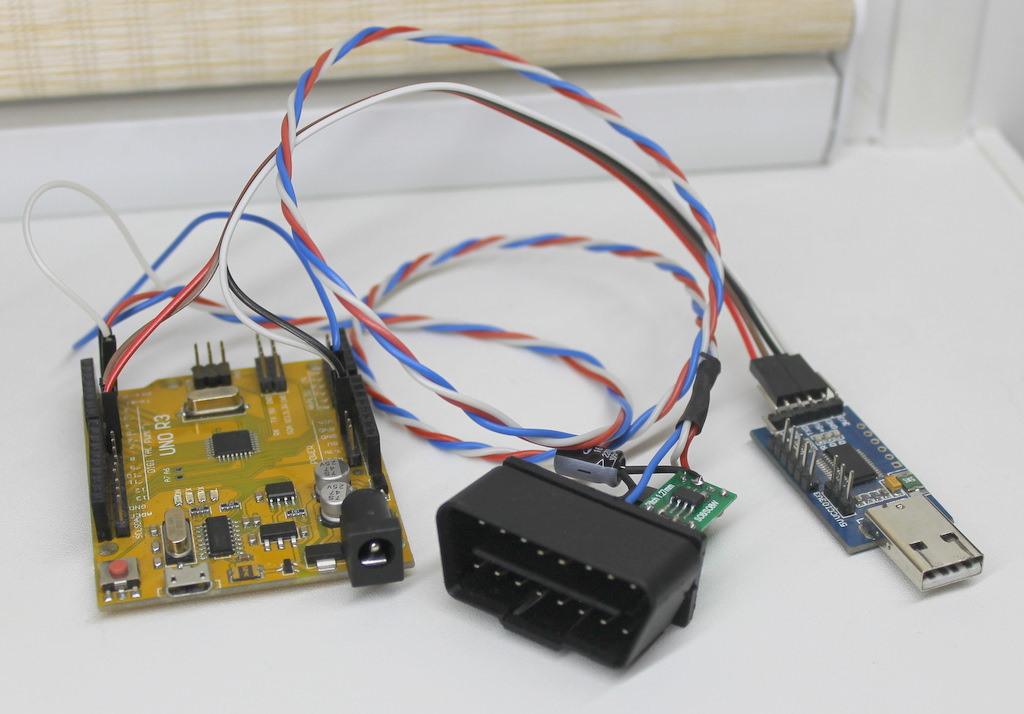
Напрямую arduino соединить с кан-шиной нельзя. Нужен конвертер уровней. Для этих целей подходит L9637D. Он подключается по классической схеме:
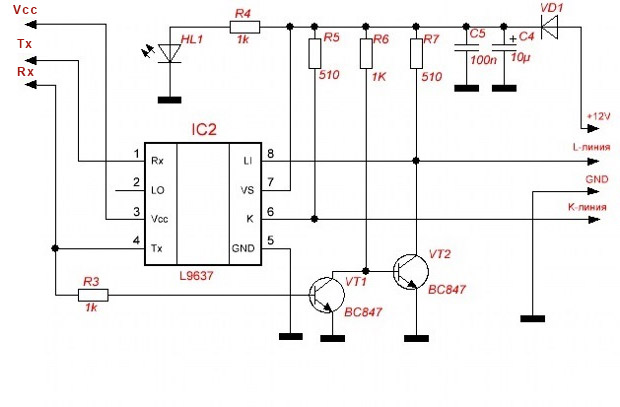
Данная схема встречается с дополнительной микросхемой ELM327. На моем ситрояне используется протокол ISO 14230. По тому достаточно только L9637D.
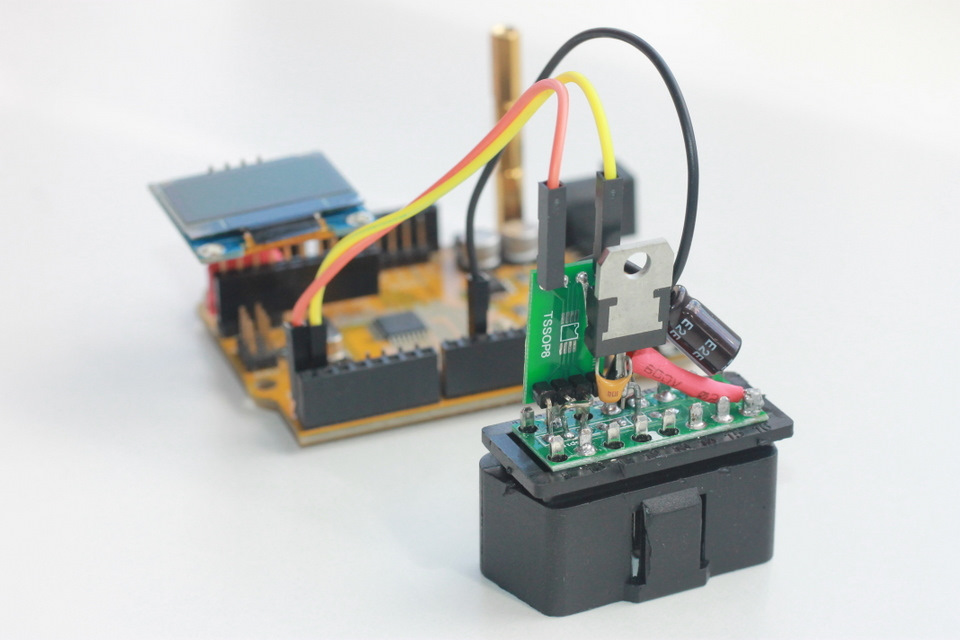
Схема питается от 12-и вольт в obd разьеме через линейный стабилизатор на 5 вольт.
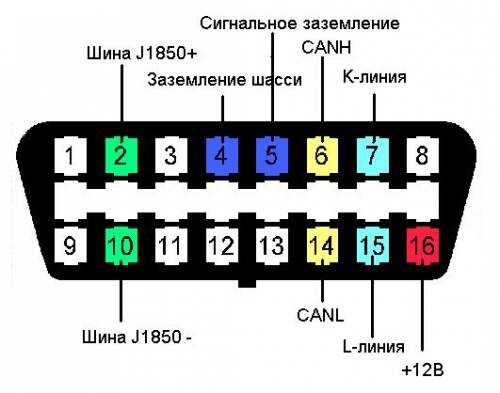
K-line — пин 7 колодки, L-line пин 15 . земля пины 4 и 5, плюс пин 16. Общая распиновка разьема obd такая:
Соединяем Tx микросхемы L9637D с 14-ым пином Ardiono, uart пины с usb-ttl адаптером.
Загружаем скетч, запускаем и.. Я получил вот такой первый пакет:
C1 33 F1 81 66 83 F1 10 C1 E9 8F BD C2 33 F1 01 0C F3 84 F1 10 41 0C 0D 20 FF C2 33 F1 01 05 EC 83 F1 10 41 05 49 13 C2 33 F1 01 0F F6 83 F1 10 41 0F 47 1B
где
C1 33 F1 81 66 — эхо на запрос инициализации шины
83 F1 10 C1 E9 8F BD — ответ ЭБУ на запрос инициализации, C1 значит ОК
C2 33 F1 01 0C F3 — эхо на запрос оборотов двигателя
84 F1 10 41 0C 0D 20 FF — ответ ЭБУ с оборотами, где 0D 20 (HEX) >> 3360 (DEC)/4 = 840 об/мин
C2 33 F1 01 05 EC — эхо на запрос температуры ОЖ двигателя
83 F1 10 41 05 49 13 — ответ ЭБУ с температурой, где 49 (HEX) >> 73 (DEC) -40 = 33 град.
C2 33 F1 01 0F F6 — эхо на запрос температуры всасываемого воздуха
83 F1 10 41 0F 47 1B — ответ ЭБУ с температурой, где 47 (HEX) >> 71 (DEC) -40 = 31 град.
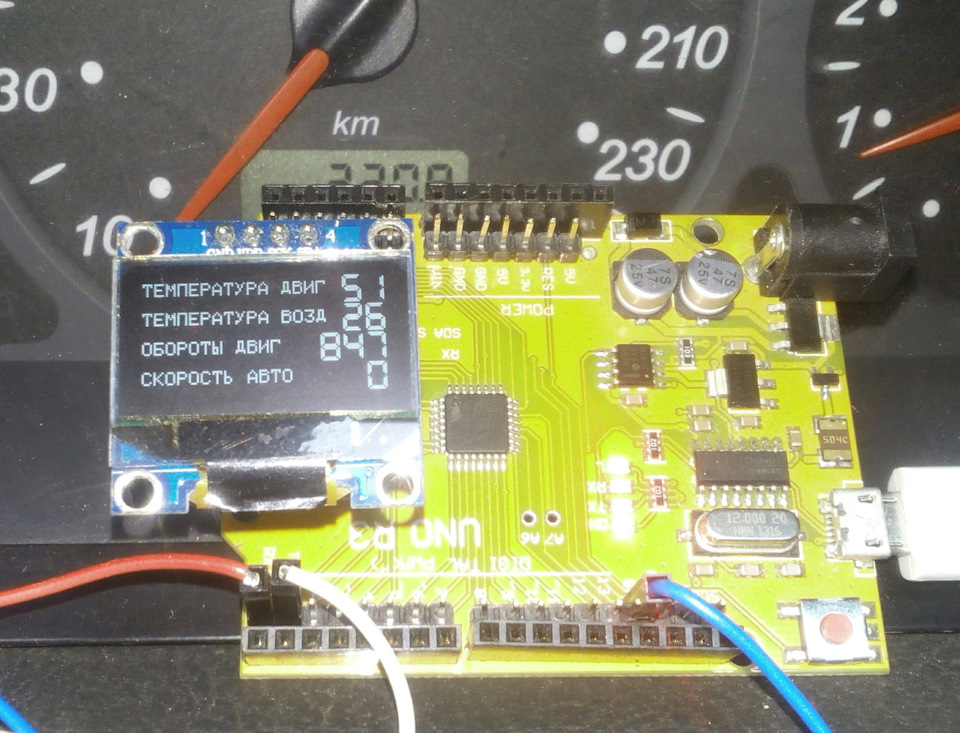
Далее немного доработал код и сделал вывод данных на oled дисплей.
- Arduino Uno Display Tripcomputer for the KW1281 KKL K-Line protocol
- Welcome
- Features
- Setup Instructions
- KWP1281 Communication
- Label Files
- Credit
- Caution
- Use this at your own risk. Be cautious. Damaging your car or your cars ECU is possible. Wrong wiring and setup can create a fire hazard. In rare cases the airbags can deploy when reading DTC errors on 0x15. The OBD was meant to be a diagnostics port only, by using a tripcomputer through it the workload on the ECU increases.
- Problems
- Future
Arduino Uno Display Tripcomputer for the KW1281 KKL K-Line protocol

Welcome
Simple trip computer for the Arduino Uno with a 16×2 Screen to display useful information in all VAG vehicles with the MARELLI 4LV ECU (VAG Number: 036906034AM). This includes most Golf mk4/Jetta/Bora from the years around 2000 that are limited to the K-Line communication and the KW1281 protocol. Newer cars since around 2005 began to adapt OBD-2 with CAN communication, that can be accessed through a ELM327 controller. No such simple controller exists currently for KKL.
This repo contains all necessary files. The only file containing code is obdisplay.cpp.
Features
- Supported baud rates 1200, 2400, 4800, 9600, 10400
- Supports KWP1281 K-Line through NewSoftwareSerial
- 3 operating modes: Acknowledge, Group reading, Sensors reading
- Read, view and delete DTC Errors
- Supported ECU addr 0x01(engine) and 0x17(dashboard)
- Automatic communication error handling
- Simulation mode to test the display
- KWP1281 exit procedure
Setup Instructions
Requirements: Arduino Uno, 16×2 Liquidcrystal Display Shield, Autodia K409 KKL OBD to USB cable
Look inside the OBD cable and note which MCU is placed (E.g. FT232R or FT232RQ), get its datasheet, find the RXD and TXD pins, solder the first visible contact point to your Arduino digital pins of your liking (Here: 2 and 3) and cut both lines after the contact point. Don’t forget to solder the +5V and GROUND from your Arduino to the OBD cable MCU (Just use the USB stripped male on the platine) since without it no communication is possible. You should have 4 cables connected between your OBD cable and your Arduino and a seperate USB or power souce input to power the Arduino and access its Serial debug communication.
See the pictures below for visual guidance.


Refer to the linked git repo for pictures and a bit more info.
KWP1281 Communication
KWP_INIT
KWP_LOOP
After initialization you can select 3 KWP_MODES:
- 0 = Keep connection alive, send acknowledge blocks
- 1 = Read all values from all groups from ECU. (ECU dependent, you may need to adapt to yours)
- 2 = Read the 4 values from one group. (ECU independent, see group menu)
Communication errors can occur which are handled by the code. There may be situations where this is not the case, please open an issue if this happens to you.
Label Files
The measurement groups of each ECU Addres contain 4 values. Each different version of each car may have a different order of values and different values to obtain. To know which groups display which values you either need to search for your cars Label File “xxx-xxx-xxx.LBL” or hook up VCDS (or any other software to display measurement groups) and record your display while clicking through the groups to get a rough image what these values correspond to.
Here are the values for the 036906034AM MARELLI ECU for the 1.6 16V Engine, which partly does not contain label files:
<div dir="auto" data-snippet-clipboard-copy-content="const uint8_t ADDR_ENGINE = 0x01;
// Label File: None
// Measurement Blocks – 0x08:
// Group 00: 1-10 with 3 digit numbers
// Group 01: 0 /min RPM, 17.0°C Temperature, 0.0% Lambda, 10110010 Binary Bits **
// Group 02: 0 /min RPM, 0.0% Load, 0.0ms Time Correction, 1012.0 mbar Absolute Pressure
// Group 03: 0 /min RPM, 1012.0 mbar Absolute Pressure, 5.4° T.B. Angle, 0.0° Steering Angle **
// Group 04: 0 /min RPM, 11.70 V Voltage, 17.0°C Temperature, 14°C Temperature **
// Group 05: 0 /min RPM, 0.0% Load, 0.0 km/h Speed, Part Throttle NA
// Group 06: 0 /min RPM, 0.0% Load, 14°C Temperature, -1.0% Lambda **
// Group 14: 0 /min RPM, 0.0% Load, 0.0 no units, Enabled NA
// Readiness – 0x15:
// Readiness Status: 10100101
// Exhaust Gas Recirculation: Failed or Incomplete
// Oxygen Sensor Heating: Passed
// Oxygen Sensor(s): Failed or Incomplete
// Air Conditioning: Passed
// Secondary Air Injection: Passed
// Evaporative Emissions: Failed or Incomplete
// Catalyst Heating: Passed
// Catalytic Converter(s): Failed or Incomplete
const uint8_t ADDR_ABS_BRAKES = 0x03; // UNUSED
// Label File: None
// Measurement Blocks – 0x08:
// Group 4: 0.00° Steering Angle, 0.31 m/s^2 Lateral Acceleration, -0.36°/s Turn Rate, N/A
// Group 5: -1.27 bar Pressure, 0.42 bar Pressure, N/A, N/A
const uint8_t ADDR_AUTO_HVAC = 0x08; // UNUSED
// Label File: 381-907-044.LBL
// Measurement Blocks – 0x08:
// Group 1: 8.0 A/C clutch sw-off cond. 1-12, 0.0 Eng. speed recog (0=no, 1=yes), 0.0 km/h Road Speed, 121.0 Standing time (0-240min.)
// Group 2: 42.0 Measured Value, 42.0 Specified Value, 219.0 Position: air supply cooled, 42.0 Position: air supply heated
// Group 3: 221.0 Measured Value, 221.0 Specified Value, 221.0 Position: air flow to panel, 40.0 Position: air flow to footwell
// Group 4: 223.0 Measured Value, 223.0 Specified Value, 223.0 Position: air flow to footwell, 39.0 Position: air flow to defroster
// Group 5: 237.0 Measured Value, 234.0 Specified Value, 234.0 Position: fresh air, 30.0 Position: recirculating
// Group 6: 0.0°C Temp displayed on panel, 7.0°C Temp. air intake duct, 0.0°C Outside air temperature, 0.0% Sun photo sensor (0-120%)
// Group 7: 0.0 Outlet temp. panel (G191), 5.0°C Outlet temp. floor (G192), 3.0°C Panel temp. near LCD (G56), 0.0 n/a
// Group 8: 0.00V Specif. Voltage air blower, 0.28V Measured Voltage air blower, 12.18V Measured Voltage A/C clutch, 0.0 no units
const uint8_t ADDR_INSTRUMENTS = 0x17;
// Label File: 1J0-920-xx0.LBL
// Measurement Blocks – 0x08:
// Group 1: 0.0 km/h Speed, 0 /min Engine Speed, Oil Pr. 2
ADDR_ENGINE = ; Label File: None Group 00: 1-10 with 3 digit numbers Group 01: 0 /min RPM, 17.0°C Temperature, 0.0% Lambda, 10110010 Binary Bits ** Group 02: 0 /min RPM, 0.0% Load, 0.0ms Time Correction, 1012.0 mbar Absolute Pressure Group 03: 0 /min RPM, 1012.0 mbar Absolute Pressure, 5.4° T.B. Angle, 0.0° Steering Angle ** Group 04: 0 /min RPM, 11.70 V Voltage, 17.0°C Temperature, 14°C Temperature ** Group 05: 0 /min RPM, 0.0% Load, 0.0 km/h Speed, Part Throttle NA Group 06: 0 /min RPM, 0.0% Load, 14°C Temperature, -1.0% Lambda ** Group 14: 0 /min RPM, 0.0% Load, 0.0 no units, Enabled NA Readiness - 0x15: Readiness Status: 10100101 Exhaust Gas Recirculation: Failed or Incomplete Oxygen Sensor Heating: Passed Oxygen Sensor(s): Failed or Incomplete Air Conditioning: Passed Secondary Air Injection: Passed Evaporative Emissions: Failed or Incomplete Catalyst Heating: Passed Catalytic Converter(s): Failed or Incomplete ADDR_ABS_BRAKES = ; Label File: None Group 4: 0.00° Steering Angle, 0.31 m/s^2 Lateral Acceleration, -0.36°/s Turn Rate, N/A Group 5: -1.27 bar Pressure, 0.42 bar Pressure, N/A, N/A ADDR_AUTO_HVAC = ; Label File: 381-907-044.LBL Group 1: 8.0 A/C clutch sw-off cond. 1-12, 0.0 Eng. speed recog (0=no, 1=yes), 0.0 km/h Road Speed, 121.0 Standing time (0-240min.) Group 2: 42.0 Measured Value, 42.0 Specified Value, 219.0 Position: air supply cooled, 42.0 Position: air supply heated Group 3: 221.0 Measured Value, 221.0 Specified Value, 221.0 Position: air flow to panel, 40.0 Position: air flow to footwell Group 4: 223.0 Measured Value, 223.0 Specified Value, 223.0 Position: air flow to footwell, 39.0 Position: air flow to defroster Group 5: 237.0 Measured Value, 234.0 Specified Value, 234.0 Position: fresh air, 30.0 Position: recirculating Group 6: 0.0°C Temp displayed on panel, 7.0°C Temp. air intake duct, 0.0°C Outside air temperature, 0.0% Sun photo sensor (0-120%) Group 7: 0.0 Outlet temp. panel (G191), 5.0°C Outlet temp. floor (G192), 3.0°C Panel temp. near LCD (G56), 0.0 n/a Group 8: 0.00V Specif. Voltage air blower, 0.28V Measured Voltage air blower, 12.18V Measured Voltage A/C clutch, 0.0 no units ADDR_INSTRUMENTS = ; Label File: 1J0-920-xx0.LBL Group 1: 0.0 km/h Speed, 0 /min Engine Speed, Oil Pr. 2 < min (Oil pressure 0.9 bar), 21:50 Time Group 2: 121960 Odometer, 9.0 l Fuel level, 93 ohms Fuel Sender Resistance, 0.0°C Ambient Temperature Group 3: 12.0°C Coolant temp., OK Oil Level (OK/n.OK), 11.0°C Oil temp, N/A


